Configuring Appointment Reminders
Note: You must have the System Email Settings configured before reminders will be sent. For additional information, check out Configuring Email in patientNOW
Warning: Text and Email Appointment Reminders will only send if the patient has consented to receive them. Check the Patients | Registration/Billing, Consent Information tab to see if a patient has consented.
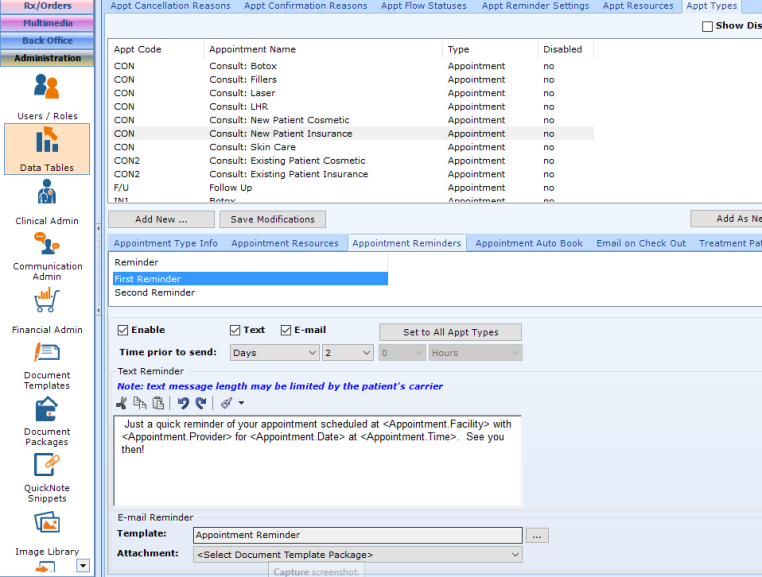
Navigate to Administration | Data Tables, Appt Types tab.
Reminders Configured by Appointment Type
patientNOW's Appointment Reminders are specific to the Appointment Type selected in each Patient Appointment. Navigate to Administration | Data Tables, Appt Types tab - Appointment Reminders subtab to configure.
The System allows you two options for reminders, a First Reminder and a Second Reminder. You are not required to use both, but they are available if you would like to use them.
Edit the First Reminder
Highlight the First Reminder under the Reminder title.
Note: If you are happy with the settings for the First Reminder and would like to use it on all of your Appointment Types, you may select the Set to All Appt Types. The First Reminder information on this Appointment Type will REPLACE any First Reminder information on ALL other Appointment Types. The system will prompt you that the replacement will occur. Please read any system message completely before selecting OK.
- Enable Text and/or Email. If you wish to have at least one Appointment Reminder sent to the patient, select the Enable check box. Then, check the Text or Email box to tell the system to send one or both.
- Note: You may send both a Text and an Email, but you are not required to send both.
- Time Prior to Send

- Note: If the appointment date is under the Time Prior to Send when the appointment is created, the reminder will send immediately. For instance, if the Appointment Date is November 1,today is October 30, and the reminder is set to send 1 week prior, it will send as soon as the appointment is created.
- Appt Creation This allows you to send an email immediately when the appointment is scheduled (after a 5-minute delay). This was added in version 7.0.193 in the first quarter of 2020.
- Appt Date Normally only used for third reminder to send a text to the patient the day of the appointment.
- Days. You may select the number of days prior to the appointment to send the reminder (e.g. 1 Day prior is the day before the appointment). If you select 0 days, you may select the number of hours before the appointment to send the reminder. So if the patient has an appointment at 11:00 AM and you have the reminder set to go 0 days and 4 hours prior to the appointment, the reminder will send at 7:00 that morning (unless the Appt Sending Time on the Appt Reminder Settings tab is set later than 7:00 AM).
- Weeks. You may select the number of weeks prior to the appointment to send the reminder (e.g. 2 weeks prior to the appointment is 14 days prior).
- Text Reminder. This section allows you to draft a reminder text to be sent to the patient, including a Confirmation Code. Some things to remember:
- The text message may be truncated by some carriers, split by others, and delivered in it's entirety by others. Keep the message as short as possible.
- If you select the Confirmation Code, the system generates the code when the reminder is sent. So, one patient may have 3 for their confirmation code and another may have 1.
- Email Reminder
- Select the Email Template to use for the Appointment Reminder for this Appointment Type.
- Select the Check-in Document Template Package configured in Administration | Document Packages to attach to the Reminder Email.
Edit the Second Reminder
Highlight the Second Reminder under the Reminder title and repeat the configuration steps information described above.
Edit the Third Reminder
Highlight the Third Reminder under the Reminder title and repeat the configuration steps information described above.
Set To All Appointment Types
If you have configured the first and second reminders for this appointment type and would like to copy them to the remaining appointment types, you may use the Set to All Appointment Types button. Note: You must select Save Modifications before selecting Set to All Appointment Types.